The myth of the universal camera
Let’s start with a simple statement, which I read years ago: “If you are setting out to buy the “perfect camera”, save your shoe leather. There is simply no such thing” (Denys Davis). This doesn’t just mean a particular camera, but refers equally to camera types. Many assume that there are only three types of camera – DSLR, mirrorless with interchangeable lenses and digital compact – or possibly add in the 35mm SLR as well. This is far from being the case. There is a multiplicity of film sizes available, and, on the second hand market, a large variety of cameras and camera types. When it comes to large film sizes, there are many makers of large format cameras in business. More than make DSLR cameras, in fact, although their camera numbers are smaller! Even within these many formats, cameras can be classified according to how you focus them (scale focusing, rangefinder or ground glass); and even these categories can be further subdivided. They all have advantages and disadvantages.
Different cameras (and formats) are suited to different jobs, even before you start to consider which manufacturer or which model within that maker’s range. Some cameras have such a wide variety of lenses and attachments available that they may approach the ideal of a universal camera, but it still remains the case that no one camera is a universal solution to every photographic problem. All cameras make compromises somewhere – the trick consists in finding the one that works best for you.
Not only are some cameras better suited to some subjects than others, but some cameras are better suited to some photographers than others. There is a part for personal preference here, as well as matters purely technical. Some cameras may be better “all rounders” than others, and some cameras may actually suit all the subjects that you photograph, and the way that you photograph them. But move outside this area, and you may well find that the camera is getting in the way, or simply not capable of achieving the results that you want.
In choosing a camera, it’s important to start with the question of what you want to use it for. The answer to that question should indicate the format and type of camera that is best suited to the job.
The camera influences how you view the subject
The most important characteristic of a camera isn’t the format, or even whether it’s film or digital. It’s how it forces you to view the subject. It’s true that some formats may offer more variations in these characteristics than others as we’ll see shortly, but all cameras are by their nature limiting.
A camera isn’t just a neutral tool that we can use at will; it strongly suggests both a way of working and a way of seeing that can be difficult to break free from. It constrains how you see the subject, how you react to the subject, and (in some cases) how the subject reacts to you. For these reasons, I think that this aspect of cameras should receive more attention than it does. In addition, some camera types are far more flexible than others (in a literal sense, as we’ll see) but flexibility does bring with it operational disadvantages.
So, how does the camera influence the way you view the subject?
Eye level cameras
Most cameras in common use are used at eye level – or at least are designed so that they can be used at eye level. Using a camera at eye level has a number of consequences:
- You tend to do what the camera is designed for, and view all subjects from your own height, even if a lower (or higher) viewpoint would be better.
- You use the camera as an extension of your own eyes, and treat the subject in the same way.
- The subject (if a person) sees you directly looking at them, and reacts accordingly.
The most important of these is the second, because it encourages us to ignore the camera entirely, and look at the scene in our normal manner. That means that we are aware of what is outside the relatively small area that the camera will record; that we are seeing in 3D rather than 2D, and, perhaps most importantly, we are participating in the scene, rather than being observers outside of it. This means that we are less aware of the actual frame; we see things outside it, and in realising that we are seeing more than will be recorded, we actually pay less attention to the things that are in the frame and should not be. We tend to blur the distinction in both directions.
For some types of photography, we need to detach ourselves from our surroundings, and examine critically what the camera will record. An eye level camera discourages this. On the other hand, using a camera at eye level can be an advantage with certain types of photography, where we do need to be aware of what is happening outside the frame so as to be able to anticipate the action within it.
Henri Cartier-Bresson produced superb photographs with a camera used at eye level because he needed to work quickly and unobtrusively and an eye level camera is fast to work with. Not all subjects require this, and some may suffer if we rush. The advantages for Cartier-Bresson apart from speed were that his Leica allowed him to continually monitor the scene unfolding before him, and adjust his position as required before capturing his decisive moment. When the position of the camera can and should be fixed (for the composition with a static subject, or where the action is to take place within a predetermined area) it takes longer if you have to bring the camera up to your eye, and becomes tiring if you keep it there. So, for some subjects, using a camera at eye level does give an extra hurdle to get over.
Using a camera at eye level also leads to a more direct interaction with people being photographed; you are unmistakably looking directly at them, and studying them. This may not be the best way to put people at their ease. Candid and street photography is certainly possible, and most has probably been done using eye level cameras although some of the earliest street photographers used large plate cameras disguised as parcels so as to be able to photograph unobserved. It helps if all you have to do is raise the camera and make the exposure, having made all the adjustments previously (or let the camera take care of them for you).
Waist level cameras
The optical arrangement of cameras with waist level finders consists of a lens (which may be the taking lens of the camera), and a mirror to reflect the light through 45º to a focusing screen. This gives an image that is the right way up, but reversed from left to right.
Using a waist level camera gives you a focusing screen that it’s easy to see is not an extension of your own vision. You see it more as you would a photograph – isolated from its surroundings. This makes it easier to study the screen, and examine all the things that you don’t look at or notice when your eye is darting around a scene in the normal way we have of looking at things. It’s easier to see the problems. Having the left and right reversed on the screen further takes us away from what we “know” is there, and aids us to study the screen rather than assuming we know what is there.
If using a digital camera with a tilting LCD screen, the screen can be used in this way,
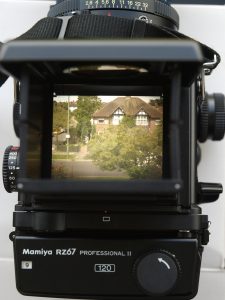
The ease of separating yourself from the scene, and seeing the image as it will appear in a print detached from reality is evident in this view of a waist level finder as it appears in use as we look down into it.

The enlarged screen image can be seen to be laterally reversed when compared side by side with the actual view.
When photographing people, you have to lower your head and take up a more subservient position, rather than the confrontational one of an eye level camera. This can also lead to a different perception on the part of your subjects.
View cameras
With view cameras the image on the screen is not only laterally reversed, but also upside down (devices are made to invert the image, if you don’t mind even more weight and bulk). Although this seems a major difficulty, it actually helps, in that you are no longer able to make so many assumptions about what is being recorded. Faced with a scene, we all tend to assume that we know what’s there, and miss the things that shouldn’t be there because we aren’t expecting them. Divorced from reality by being upside down, the screen encourages you to examine it more closely. If a composition works upside down, it should also work when seen the right way up. And a view camera encourages you to study the forms, shapes and masses without the distraction of knowing what they are.
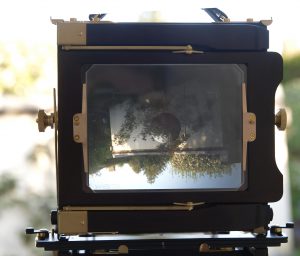
The above shows a view camera screen as it appears if a focusing cloth is not used to cut out the reflections. Normally, it would be a clear image. The actual scene (for comparison) is shown below.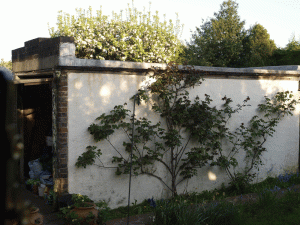
Note that on the view camera screen, the image is not only upside down, but also reversed left to right.
Camera types
Most different camera types are made in several different formats, so we can ignore the question of format here and look at the basic design issues
Reflex cameras
All reflex cameras have a screen onto which the image from the lens is focused and the “reflex” part of the name is given because there is a mirror involved in getting the image from the lens to the viewing screen. (This diagram is from Wikipedia)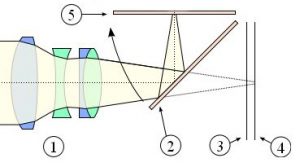
1. The lens
2. The mirror. This is usually front silvered which makes it a particularly delicate part of the camera.
3. The focal plane shutter. Some cameras use a between lens shutter (see the chapter on Controlling Exposure for types of shutter).
4. The position of the sensor or film.
5. The focusing screen. Some cameras have interchangeable focusing screens, allowing you to choose the one most appropriate to the job in hand.
Figure 100 Reflex camera schematic
Reflex cameras come in two varieties; those with a single lens used for both viewing and recording the image and those with two lenses, one for viewing and the other to record the image. Logically, they are called single lens reflex and twin lens reflex cameras respectively.
The diagram above stopped at the focusing screen. To provide a bright view of the screen, either a hood is placed on top or a pentaprism or other device is used to facilitate eye level viewing.
If a waist level finder is used, the image will be the right way up, but laterally reversed. With a pentaprism, it will be both right way up and right way round.
Eye level or waist level?
We’ve noted that using a camera at eye or waist level can influence how you react to the subject; but it can also alter the way you view the subject as well. A waist level finder means that you can see the image and compose it when your eyes are some way away from the screen; and that in turn means that you can hold the camera above your head and still compose a photograph if you need a higher viewpoint. The oft-quoted example is photographing over the heads of a crowd. Waist level finders are also very useful when the camera is used low down, since you can view the screen from above.
The downside for some of waist level finders has already been noted – the image is laterally reversed. It is often said that panning the camera (which means moving it during the exposure to follow a moving subject, with the intention of keeping the subject sharp and blurring the background) is more difficult (if not impossible) with a waist level finder because you have to pan the camera the “wrong” way as the image is laterally reversed. It is in fact only a matter of practice, and takes very little time to pick it up before it becomes second nature to pan the camera in the correct direction.
SLRs (Single Lens Reflexes)
SLR designs require the mirror to be moved out of the way to make the exposure, and repositioned afterwards to enable the scene to be viewed again. All modern 35mm and digital SLRs have an instant return mirror, which flips out of the way for the exposure, and returns to the viewing position immediately afterwards. Medium format film SLRs may not. The necessity of a bright image for viewing means that the aperture on the lens has to remain wide open for viewing and focusing, then close down for the actual exposure and reopen again afterwards.
The advantages of being able to see exactly what the camera will record are obvious. It means that you have no problems with parallax errors (if you view a subject from two different positions, you see slightly different things – it’s the basis of our binocular vision). This matters more as the subject distance decreases. Viewing through the lens makes it easier to fit interchangeable lenses, and means that you can examine the image at the taking aperture (if it’s bright enough to see it). It also means that you are viewing through any fitted filters (for good or ill).
The downside is that the mirror adds extra complexity, takes time to swing up out of the way before the exposure can be made, and can vibrate the camera by that movement and cause camera shake, even when the camera is mounted on a tripod. That this is a very real problem is demonstrated by the advice that Nikon give for users of their new D800 camera – that to take full advantage of the resolution possible, the camera must not only be tripod mounted, but mirror lock up used. The alternative – raising the mirror first – means that the camera needs to be on a tripod, since the viewfinder is now unusable. In any case, at the exact moment of exposure, you have no view of the subject (unless using a tripod and looking directly at the subject).
The mirror movement not only takes time, but also makes a noise, so SLR designs are not particularly quiet compared to the alternatives.
All digital SLR and all current 35mm SLR cameras have fixed pentaprisms; most medium format film SLRs allow either a waist level finder or a pentaprism to be used. SLRs have been made from half frame 35mm up to large format film.
There is a variant on the SLR that uses a fixed mirror, rather than one that swings out of the way at the moment of exposure, which has been dubbed “SLT” for “Single Lens Translucent Mirror”. The camera splits the light that hits the mirror, with some going to the viewfinder system and the remainder passing through the mirror to reach the sensor.
The advantage of this type of design is that without the mirror slap, the camera should be quieter and suffer from fewer vibrations; additionally, there will be no blackout of the viewfinder although it should (if purely optical) go dark as the lens stops down. Without the mirror having to move, the shutter lag could be less, and the frame rate (the number of exposures per second that can be made) should be higher.
The disadvantage is that the splitting of the light will reduce the amount available to make the exposure, and any dust or dirt on the mirror will now potentially be visible as the mirror is in the optical path rather than being removed from it at the moment of exposure.
This isn’t a new idea; Canon made a 35mm SLR called the Pellix in the 1960s that used this principle. A special version with a very fast for the time (10 fps) motor drive was produced for the 1972 Olympics; but Canon didn’t continue down this route.
TLRs (Twin Lens Reflexes)
Twin lens reflex cameras are effectively two cameras mounted one on top of the other, with the top one being a reflex design used for viewing. In this case, there is no need for the additional complexity of a moving mirror. Twin lens reflexes have been made for all film sizes from 35mm up to 10”x8”.
TLR cameras are usually used at waist level, but a pentaprism or equivalent to enable the camera to be used at eye level is generally available. They also usually have a pair of cut outs in the viewing hood that allow sighting through to determine the framing.
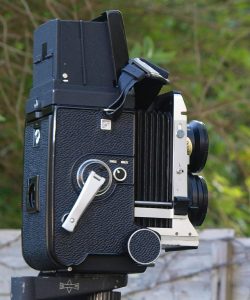
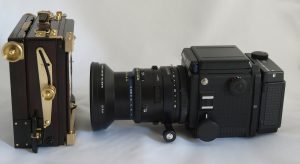
The above photograph shows a Mamiyaflex C330 TLR camera. The two lenses are clearly visible, as is the erect viewing hood. On the rear of the hood you can see a square hole cut out; this is used to sight the camera at eye level (there is a corresponding window available in the front of the hood that can be opened when required). The idea is to enable the camera to be used in situations where rapid tracking of the subject is required, as in sports photography.
They are obviously larger than SLRs (since they are effectively two cameras mounted one on top of the other). But because there is no mirror to swing out of the way, they have a smaller delay before the shutter fires, they do not block your view at the moment of exposure, and are relatively quiet in operation.
Parallax errors occur, but in the case of two lenses mounted directly above each other, are simply corrected by raising the camera before exposure to place the taking lens in the position of the viewing lens. Devices are made to do this precisely for you, although clearly to use them the cameras must be mounted on a tripod. There is often a marker in the viewfinder that moves downwards as you focus to indicate the difference in the field of view as you focus closer.
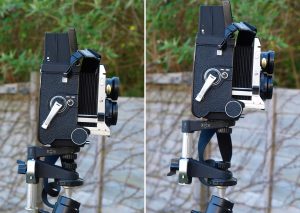
The above photographs show a Mamiyaflex TLR with its paramender attachment. In the right hand image, the paramender is extended to move the taking lens up into the position occupied by the viewing lens in the left hand image.
Because the viewing lens is not the taking lens, it can be a larger aperture, to make focusing easier. In the case of one (long discontinued) 35mm TLR, it was even a longer focal length with a scaled up viewing screen to make things easier to see and to focus.
Rangefinder Cameras
Rangefinder cameras use a separate rangefinder for focusing, and a direct vision finder to view the subject. Usually, the rangefinder and viewfinder window are the same; on early cameras this wasn’t the case. The rangefinder will normally present either a split image, where you adjust the focusing to make the two halves of the image line up, or it is a “coincident image” type, where you see a double image until correct focus is achieved. Normally, focusing will adjust the view presented by the rangefinder, in which case the rangefinder is “coupled”. Older cameras were “uncoupled” which meant that you adjusted the rangefinder until the image was focused, and then read the distance from the rangefinder and transferred it to the lens using the distance scale engraved on it.
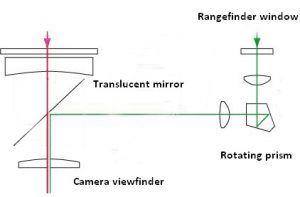
The simple camera viewfinder is shown on the left hand side of the diagram; the image is formed by the lens(es) in the viewfinder’s system and is seen by the photographer. The right hand side of the diagram shows a similar arrangement for the rangefinder window, with the image from this window being diverted by a prism (or mirror, in some designs) and a translucent mirror to also pass out of the camera’s viewfinder. Because the viewfinder window and rangefinder window are separated, the images are not exactly the same, and in the general case won’t line up. The rangefinder image has its position adjusted by rotating the prism until the two images superimpose and the amount of movement required depends on the distance. At this point, the distance can either be read off a scale (if uncoupled) or will have been set by focusing the lens (the lens focusing mechanism is used to rotate the prism). The accuracy of the rangefinder depends on the separation of the windows – the “rangefinder base”. The longer the base, the more accurate the rangefinder.
The use of a viewfinder that does not present the image seen by the taking lens makes using interchangeable lenses a little trickier, although the rangefinder cameras that allow you to change the lenses normally have viewfinders that adjust for the lens attached. Different bright line frames can be seen in the viewfinder, indicating the field of view of different lenses; these can help in lens selection for the required field of view.
Focusing a wide angle lens (particularly in low light conditions) is much easier with a rangefinder than an SLR; but at the other end of the scale, the accuracy of the rangefinder is insufficient for long lenses. It is said that the popularity of the 135mm lens arose because it was the longest focal length that could be accurately focused with a Leica; and in 35mm circles in pre-zoom days it was the lens everyone had.
The viewfinders of rangefinder cameras, like TLRs, usually contain indications of how the framing will alter as the subject comes closer, but although they can indicate where cut offs will occur, they cannot show the relationship of objects which is dependent on viewing from the position of the taking lens.
Like TLR cameras, they are relatively silent in operation, and fast to use. In low light conditions and with wide angle lenses, they are also easier and more accurate to focus than SLR designs. Rangefinder cameras have been made in sizes up to large format.
View cameras
These are cameras that let you view the image directly through the taking lens; the image is projected onto a ground glass screen, which occupies the position that the recording medium will occupy when the exposure is made. You therefore have to have the camera position fixed so that the image as viewed and composed is the same as the image as taken.
These have all the advantages of through the lens viewing of the SLR, and the silence of the TLR and rangefinder. They also make you insert the film after focusing, and cut off the direct, through the lens view of the subject for some time before and after the exposure is made.
View cameras come in two types: monorails and field cameras. The former have the lens panel mounted at one end of a bar, and the film holder and ground glass at the other joined by the bellows. They generally offer the greatest range of movements and precision, but at the price of being large and unwieldy used out of the studio. Field cameras are intended to be used outside, and usually fold up into a box shape for carrying. The physical connection between the baseboard and the camera back on a field camera reduces the amount of movement that can be made.
View cameras are normally physically large, and can be heavy (although not necessarily heavier than a camera using a smaller format). The film is relatively expensive, but it is also possible to use roll film by fitting a roll film back; if using a 5×7 camera, you can even use a roll film back to create 6x17cm panoramic images.
The other obvious feature of a view camera is that it is slow to set up and to use. The necessity to focus (using a focusing cloth or possibly a hood to shade the screen) and then to insert the film before making the exposure means that an instant response isn’t possible. The gain that you make from the slowness and the expense is that you do spend more time considering the image, and the large screen aids considerably in composition.
The reason that view cameras are still used (and makers have waiting lists) is twofold – the technical quality of the results, and the availability of a full range of movements that adds extra creative controls to the photographer.
The following sequence shows a Wista field camera being opened.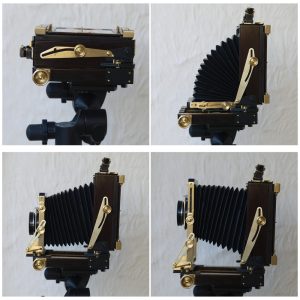
Top pair of photographs:
On the left, the camera is collapsed, with the ground glass screen on the top. The first stage of opening is to pull the camera back into the vertical position, as shown on the right. The lens panel is still positioned next to the base of the camera.
Bottom pair of photographs
The left hand photograph shows the camera after the lens panel has been pulled forward and swung up into position. The lens can be seen to be below the centre of the camera back, indicating the potential for shift movement. The photograph on the right shows the lens panel raised to the maximum amount for comparison.
View cameras are often considered to be synonymous with large format film cameras, but this isn’t the case – they are made in roll film sizes as well as large format film. Not all large format cameras are view cameras; as we have seen large format SLRs, TLRs and rangefinder cameras have been made. In the case of the rangefinder versions, the cameras were equipped with rangefinders and a direct vision finder, and so can be used hand held (the old press cameras were 5×4″ cameras and used hand held). They can also be used with a ground glass if movements are being used. Even the “film” part isn’t necessary, as digital backs are available for large format cameras as an alternative to film.
Specialist cameras
As well as the general purpose cameras above, there are specialised cameras made for specific subjects. The panoramic camera is an obvious example, but there are other specialised cameras made, some for subjects so obscure (outside those with a special interest in them) that most people will never have come across them. Specialist cameras are (or have been) made for subjects as diverse as race finish recording and photographing cylindrical objects on a single sheet in true proportions.
The existence of specialised cameras serves to make the point that there is no such thing as a camera that can cover all subjects well.
The viewfinder
I think that the viewfinder is the most important attribute of a camera after the camera type and format. A camera should aid you in taking photographs, and at the very least should not place obstacles in your way. There are obviously personal preferences and prejudices at work, but I believe that a viewfinder should not just let you see what part of the scene in front of you the camera will record, but also be an aid to composition.
The optical arrangement of viewfinders will determine the apparent image distance which is normally arranged to be easily seen by most people; for modern DSLRs this is around three feet or a metre. Older designs placed the image at infinity.
Providing information about shutter speeds, apertures, focusing points and so on is not the primary function of a viewfinder. It is rare that conditions change so quickly that any of these basic settings alter by much, even if the camera is being used in automatic mode. Our minds can only take in so much information and the more extraneous information that is presented in the viewfinder, the less attention we’ll pay to the subject, which is the reason we have a viewfinder in the first place. If we are watching changing apertures or shutter speeds, to that extent we are not watching the subject.
If the primary purpose is to let us view the subject, then the screen should appear large enough for this to be done with ease. The apparent size of the screen is a result of the way that the viewfinder system is constructed, rather than the physical size of the screen itself, or the format used by the camera. Modern DSLRs tend to have visually small screens, hardly suitable for a close scrutiny. This is a design decision not a practical necessity. I’ve used an APS-C size DLSR where the screen makes it impossible for me to tell what’s in focus; an APS-C size DSLR where the screen looks very miniscule indeed; and a 4/3 system DSLR which although it uses a smaller format than APS-C yet allows focusing with ease and looks a reasonable size to boot. It can be done – it’s all a question of the optical system in the viewfinder.
Unfortunately, the apparent size of a viewing screen isn’t quantifiable in the same way as the LCD screen on the back of a digital camera is. Camera makers seem to be happy to have miniscule viewfinders, so long as they can point to a large screen on the camera back. This causes problems if people use this screen to frame the shots, because they are holding the camera at arms’ length – a recipe for camera shake. There is clearly a minimum distance that you can hold a camera and still see clearly what is on the (still small) screen. Makers will doubtless say that the screen is only there to aid in reviewing the images, or, in the case of Live View, to use while the camera is on a tripod. Unfortunately, many people use it as the viewfinder – which seems to indicate that they find the purpose built viewfinder inadequate for the purpose.
There seems to be a tendency to remove the separate viewfinder altogether from modern non-SLR digital cameras, and have only a screen on the camera back. I’ve used a digital compact without a viewfinder, and have endless admiration for people who can frame with accuracy using such a camera – or even just hold it level. I find myself unable to achieve either goal, making such a camera unsuitable to me for serious use.
Viewfinder accuracy
You should be able to assume that the viewfinder of a camera of SLR design – where you’re viewing the image projected by the taking lens onto a ground glass screen – is accurate. Alas, you can’t. The same reasons that lead to small screens also lead to screens that show less than will be included in the final photograph – it makes a camera bigger, heavier and more expensive if you show 100%. A few cameras (the Nikon F was a prominent example) did have 100% accurate viewfinders. But even Nikon abandoned this principle on later cameras.
The argument for showing less than the film would record was that slide mounts cut off part of the area, or that prints weren’t made from the whole of the negative, so the cut off compensated for these things. These arguments scarcely apply to digital, yet the cut offs remain. Whatever the intangible values for those who don’t want to use all the film or sensor area that they think that they have available, the big tangible value for the camera makers is that the camera is smaller, lighter and cheaper to make – all good selling points. This becomes more obvious when you look at cameras where the pentaprism used for eye level viewing can be exchanged for a waist level finder; the waist level finder usually will show 100% of the area that will be recorded.
This wouldn’t be so bad if the amounts were small, and evenly distributed. Manufacturers will say that a viewfinder shows 98%, 94% or even as little as 90%. But of what? And how is the “missing” 2%, 6% or 10% distributed? Evenly round the four sides or very unevenly? In the case of the Pentax 67, the viewfinder gives a 90% coverage. This apparently means 90% vertical and 90% horizontal, meaning that only 81% of the image area is shown. Not having examined this camera, I can’t say whether the following is correct, but one reviewer said that in the case of the vertical coverage 1/3 was lost from the top and the remaining 2/3 from the bottom of the screen. What the side coverage was went unreported.
Other cameras have more excuse for inaccuracies, as you are not viewing through the lens. Digital compact cameras usually have two different “viewfinders” – the viewfinder proper, and the screen on the camera back. It is not unknown for the coverage of the two to differ, and neither be the same as the coverage actually recorded.
The focusing screen
This follows on from the viewfinder as a whole. With reflex and view cameras, the image is viewed on a focusing screen and some cameras let you change this screen; others don’t. If it is possible to change the screen, you should look at the alternatives. There is a very simple optical necessity involved in the screen – you can have it bright, or you can have it show you what’s sharp. At one extreme, you can have a screen that will show the scene as brightly as possible, but everything will be in focus. At the other, you can have a plain ground glass, which will dim towards the corners. Actually, it will be dim in the centre and even dimmer in the corners.
A Fresnel lens is usually used with a plain ground glass to even up the illumination, but a Fresnel lens is marked by concentric rings that can be obtrusive. Because of this, a plain circle is usually left in the centre of the screen. Some Fresnel lenses are more obtrusive than others – on some cameras it isn’t obvious that they are used, whereas on others the rings are so prominent that the area of the screen that they cover is difficult to use for focusing.
Before auto focus became all the rage, 35mm SLRs had screens with a variety of focusing aids that are now missing: microprisms, split image rangefinders and the two combined. Some screens were very specialized, such as the ones intended for use when the camera was attached to a microscope. But the basic point was the realization that one screen was not suitable for all purposes, and a choice was necessary.
Above are shown two focusing screens for the Olympus OM system. On the left is a microprism screen, with the large central area of microprisms clearly visible. The screen on the right has a spilt image in the centre of the screen, with a microprism ring surrounding it.
Many people like a screen which has ruled grid lines, making it very useful for checking that the camera is level when not using a tripod and spirit level. Some digital cameras can have such a grid appear optionally in the viewfinder.
If the ground glass is large enough, it is possible to mark it (with a chinagraph pencil so that the marks may be erased afterwards), which is sometime done in studios to indicate things such as where the text in an advertisement, or the title on a magazine cover, will be placed, to aid in the composition of the image. This does require the ground glass to be accessible, which limits it to certain cameras and camera types.
Changing the camera viewing system
Sometimes you don’t have a choice. Normal DSLR cameras and 35mm SLRs are eye-level use only (unless you fit a right angle finder attachment which I’ll come to in a moment). But some 35mm SLRs were made with interchangeable viewing systems, and most medium format cameras are modular in design and let you change the camera from eye to waist level. As far as I know, no large format cameras are currently made with waist level viewfinders (you could get 10”x8” TLRs until fairly recently, amazing though it might seem that such a beast would be made at all).
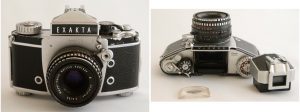
The (rather elderly) Exakta shown above has a removable pentaprism, as shown in the photograph on the right where the pentaprism and focusing screen have both been removed. Four different alternatives were available: a waist level finder, a pentaprism, a magnifying finder, and a stereo finder (a stereoscopic converter was available).
Some cameras have fixed viewing systems, but allow the use of a right angle finder. These
let you look down into the eyepiece, making it easier to use at a low level on a tripod, but you still have to put your eye right up to them, so you can’t view the image at waist level. Waist level finders have built in magnifiers for focusing (that you can flip out of the way if you need to) and these are also used with the eye close up to them, for critical focusing.
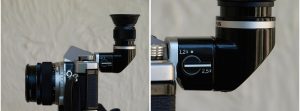
The above photos show a right angle finder attached to an Olympus OM1; the enlarged image shows that the magnification can be increased to aid in critical focusing. It certainly lets you look in from above, but unlike a true waist level finder you couldn’t use it at waist level if you intended to be able to actually see the image.